Tuesday, December 17, 2024

Dried Chilies to Replace Chili Powder


How to Prepare Chiles for Cooking

Cooking with chilies is a three-step process. First, you've got to clean them by removing their stems and seeds. (Wear gloves if you're in any way sensitive to spicy food or have sensitive skin!) Next, I recommend toasting them for maximum flavor. Finally, they need to be ground or puréed. I'll walk you through each of these processes.

Clean - remove stems and seeds

Toasting chilies, just like toasting spices, can improve their flavor and add complexity. It's not 100% necessary, but it takes only a few minutes. There are a number of ways to do it.

The oven is the best method if you're toasting lots of chilies. Spread them out on a rimmed baking sheet, and place them in an oven preheated to 350°F (180°C), turning them occasionally, until they smell roasted and are very pliable. (If you toast the chilies before cleaning them, they'll also puff up.)

A skillet is a decent choice if you're doing only a few. Place them in a dry skillet, and heat over medium heat, tossing them occasionally, until they're toasted and pliable. It'll take about three minutes.

The microwave is an even better tool for the job than the stovetop, and it's my method of choice for a single batch of chilies. Just lay the chilies on a microwave-safe plate, and microwave them on high in 15-second intervals until they're toasted and pliable. It should take around 30 seconds.

Ingredients

  • 3 whole sweet fresh dried chilies, such as costeño, New Mexico, or choricero, stems and seeds removed

  • 2 small hot dried chilies, such as de árbol or cascabel, stems and seeds removed

  • 3 whole rich, fruity dried chiles, such as ancho, mulato, negro, or pasilla, stems and seeds removed

  • 2 whole chipotle dried chilies canned in adobo sauce, plus 2 tablespoons (30ml) sauce

  • 1 quart (950ml) homemade or store-bought low-sodium chicken stock

  • Directions

    1. Place chiles on a microwave-safe plate and microwave on high at 15-second intervals until hot, pliable, and toasted-smelling, about 30 seconds total.

    2. Combine all chiles in a medium saucepan and add chicken broth. Simmer over medium-high heat until chiles are completely tender, about 10 minutes. Alternatively, place chiles and chicken broth in a 2-quart microwave-safe container, cover with plastic wrap, and microwave on high power until liquid is simmering, about 5 minutes. Let stand 5 minutes. Transfer to a countertop blender or hand blender cup and blend until completely smooth.

    3. Store chile paste in the refrigerator for up to 1 week. Alternatively, divide paste into ice cube trays, freeze, and transfer frozen chile paste cubes into freezer bags to store in the freezer for up to 6 months.

    4. Exchange 4:1 (4 paste to 1 powder)

Saturday, November 23, 2024

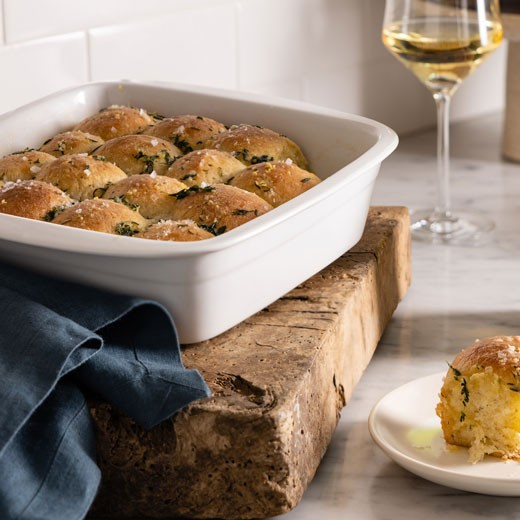
Rosemary Potato Rolls with Herbed Garlic Butter

This bread is so good it’s bound to become a tradition this Thanksgiving. Baking bread can sometimes be intimidating, but these little rolls are actually quite straightforward to make.

Ingredients

3/4 cup unsalted butter

1 1/4 cups milk

3 tbsps white sugar

1 package (2 ¼ tsp) active dry yeast

3 1/2 cups flour, plus a bit more for dusting

1/2 cup instant potato flakes

1 egg

2 tbsps chopped rosemary

2 tsps salt

For the garlic butter:

3 tbsps unsalted butter

1 large garlic clove, minced

1 tbsp roughly chopped fresh thyme


Directions

Preheat oven to 350°F.

In a small saucepan gently warm the milk, butter and sugar until butter is melted; don’t get it too hot or it will kill the yeast. Sprinkle the yeast over the surface of the warmed buttery milk and allow the yeast to bloom for 5 minutes. If it doesn’t smell “yeasty” start over/find fresher yeast.

Add the bloomed yeast liquid to a bowl of a standing mixer with a dough hook attachment. Add in the flour and potato and knead on high until combined. Add the egg, rosemary and salt and continue kneading. The dough should be slightly tacky, but not sticky. Add more flour if it seems too wet.

On a lightly floured surface, turn the dough out and shape into a ball. Transfer the dough ball to a lightly greased bowl and cover with a damp tea towel or plastic wrap. Set in a warmer area of the kitchen and allow the dough to rise until doubled (about 1 ½ hours).

Transfer the dough to a lightly floured surface once again. Gently punch the dough down and cut into four equal portions. From those four portions continue cutting and forming small dough balls; you should have 12-18 balls in total.

Butter a baking dish or cast iron pan and transfer the shaped dough to the dish. Let the dough balls rise for an additional thirty minutes - preheat the oven to 350°F while they’re rising.

Bake for 25-30 minutes, or until golden brown.

While baking, make the garlic butter. In a small pan melt the butter with the garlic and thyme and allow the garlic to cook on low heat for 2-3 minutes.

Remove the rolls from the oven and brush with the garlic butter. Finish with a sprinkling of flakey salt. Serve warm.

Serves 16


Tuesday, November 19, 2024

Easy Yeast Rolls

Ingredients:

1 cup whole milk (you can use other milk but whole milk makes the rolls the yummiest)

1/2 cup butter (one stick)

1/4 cup sugar

2 eggs (large)

1 teaspoon salt

4 cup bread flour

2 1/4 teaspoon yeast

(1 or 2 T water if needed)

Note: save the butter wrapper in the fridge for later.

Instructions:

Warm the milk to between 90 and 110 degrees F.
Mix all of the ingredients together minus the optional water.
(If you have a mixer with a bread hook you can use that or just mix by hand)
Once all the ingredients are added if the dough seems very dry add 1 tablespoon of water.  A second tablespoon of water can be added if still needed.  I rarely need to add the water unless the air in my home is extremely dry.
See picture for how the dough should look.


Once all of the ingredients are fully incorporated knead the dough on a lightly floured surface.

Knead until the dough is smooth and elastic (approximately 6 to 9 minutes).

Place the dough in a very lightly oiled bowl, cover with a damp towel and place in a warm area.
Allow the dough to rise until it is about double in size (approximately 60 minutes.)
(My grandmother liked to let her bread rise in the laundry room while the dryer was running as the heat made the room warm or on top of the refrigerator.)


If you saved the butter wrapper use that to butter the 9 x 13 pan (I use a pyrex).
Just rub the empty butter wrapper all over the bottom and sides of the pan.
Your hands stay clean and you are using butter which would have been thrown away.

You will be making 24 rolls.
Split dough in half and then again so you have 4 even sections of dough.
Divide each of those in half again and then divide into 3 even balls.


To Shape Rolls: (see link below for a video how to)
Take a section of the roll in your hand.
Make a circle with your thumb and fingers that is smaller than the dough.
Hold the dough in the circle your hand creates.
Using your other hand push gently on the backside of the roll (inside your hand.)
Keep pushing gently while your other hand stays in a circle and smooths the outside of the roll.
Continue until the roll is smooth and shaped into a ball.
I make 6 rows of 4 rolls and place them in the greased pan.
Cover the rolls with a damp towel and let rise in a warm area for 15 to 20 minutes.
(You can let the rolls rise for longer, sometimes if the oven is not free I have let them rise for almost an hour and they were still perfect.)
The rolls should increase in size by about 50%.

Remove the damp towel and bake at 375 degrees F for 14 to 17 minutes or until the rolls are slightly golden brown.  The color will be very subtle so make sure you do not over cook.

Serve warm with butter.
Very yummy!!!


Thursday, November 7, 2024

Hot Cocoa Dip


Ingredients

1 package (8 ounces) cream cheese, softened

1 cup marshmallow creme

1/2 cup McCormick® Hot Cocoa Finishing Sugar, plus more for sprinkling

1 cup frozen whipped topping, thawed


INSTRUCTIONS

1 Beat cream cheese, marshmallow creme and Hot Cocoa Sugar in medium bowl with electric mixer until well blended and smooth. Gently stir in whipped topping.

2 Transfer to serving bowl and sprinkle with additional Hot Cocoa Sugar. Serve with assorted dippers such as graham crackers, fresh fruit, or marshmallows.

Hot Cocoa Marshmallow Cookies


Ingredients

2 1/2 cups all-purpose flour

3/4 cup Dutch process cocoa powder

1 1/2 teaspoons baking soda

1 teaspoon salt

1 stick (8 tablespoons) unsalted butter, softened

1 1/3 cups firmly packed light brown sugar

1/2 cup granulated sugar

1/2 cup oil

2 large eggs, room temperature

2 teaspoons McCormick® All Natural Pure Vanilla Extract

1 2/3 cups miniature marshmallows

1/2 cup McCormick® Hot Cocoa Finishing Sugar


INSTRUCTIONS

1 Preheat oven to 350°F. Line 2 large baking sheets with parchment paper. Whisk flour, cocoa powder, baking soda and salt in medium bowl. Set aside.

2 Beat brown sugar, granulated sugar and butter with an electric mixer (or in bowl of stand mixer) on medium speed until light and fluffy. Add oil, eggs, and vanilla; beat just until smooth. Gradually add flour mixture, mixing just until combined and scraping sides as needed. Let dough stand 10 minutes.

3 Using a cookie scoop or large spoon, scoop dough into 2-tablespoon portions. Roll each portion into a ball. Use thumbs to make a well in the center of each dough ball. Place about 6 mini marshmallows in well, then carefully pinch dough over to enclose marshmallows. Gently re-roll dough into balls.

4 Place Hot Cocoa Sugar in shallow bowl or dish. Roll cookie dough balls in Hot Cocoa Sugar until well coated. Place on prepared baking sheets about 2 inches apart.

5 Bake 13 to 16 minutes. Cool cookies on pans 3 to 5 minutes. Transfer to wire rack to cool completely.

Hot Cocoa Puppy Chow


Ingredients

1 1/4 cups confectioners' sugar

6 tablespoons McCormick® Hot Cocoa Finishing Sugar

4 cups rice squares cereal

2 cups chocolate corn puffs cereal

1 package (11 ounces) chocolate chips

2 cups miniature marshmallows

KEY PRODUCTS


INSTRUCTIONS

1 Mix confectioners’ sugar and Hot Cocoa Sugar in large resealable plastic bag. Set aside.

2 Mix cereals in large bowl. Melt chocolate as directed on package. Pour over cereal; stir gently to coat. Add chocolate coated cereal to bag with confectioners’ sugar mixture. Seal and shake to coat evenly.

3 Pour cereal mixture onto rimmed baking sheet. Stir in marshmallow. Let stand 30 minutes or until chocolate is set. Store in an airtight container at room temperature.

Gingerbread Pancakes


Ingredients

1 egg

1 cup all-purpose baking mix, such as Bisquick®

1/3 cup milk

1/4 cup packed brown sugar

2 tablespoons oil

1 tablespoon molasses

1 tablespoon McCormick® Gingerbread Spice Finishing Sugar

2 teaspoons McCormick® All Natural Pure Vanilla Extract


INSTRUCTIONS

1 Lightly beat egg in medium bowl. Add remaining ingredients; mix until well blended. Set aside.

2 Heat lightly greased griddle or skillet on medium heat. Pour scant 1/4-cups of batter onto pan. Cook 1 to 2 minutes or until bubbles begin to form on top of the pancakes. Flip pancakes.

3 Cook 1 to 2 minutes longer or until golden brown. Remove from skillet; keep warm. Repeat with remaining batter. Top pancakes with butter, syrup and whipped cream, if desired. Sprinkle with additional Gingerbread Sugar to serve.

Test Kitchen Tip:To make Gingerbread Pancakes in the shape of gingerbread men, all you need is a cookie cutter! Spray the inside of a 4-inch gingerbread man cookie cutter with no stick cooking spray. Place on preheated griddle or skillet and pour batter into cookie cutter. Cook 1 to 2 minutes, or until bubbly on top, then carefully remove the cookie cutter using tongs. Flip and cook 1 to 2 minutes longer until lightly browned.

Gingerbread Latte


Ingredients

2 cups whole milk

3 tablespoons packed brown sugar

2 tablespoons molasses

1 teaspoon McCormick® Gingerbread Spice Finishing Sugar

1/2 teaspoon McCormick® All Natural Pure Vanilla Extract

1 cup strong brewed coffee


INSTRUCTIONS

1 Bring all ingredients, except coffee, to simmer in medium saucepan on medium heat, stirring to dissolve sugar.

2 Whisk in coffee until frothy. Pour into mugs. Top with whipped cream and sprinkle with additional Gingerbread Sugar to serve.

Air Fryer Gingerbread Donuts


 Ingredients

3 tablespoons McCormick® Gingerbread Spice Finishing Sugar

1 can (16.3 ounces) large flaky biscuits, such as Pillsbury® Grands!® Flaky Biscuits

3 tablespoons unsalted butter, melted

2 teaspoons sugar


INSTRUCTIONS

1 Place Gingerbread Sugar in medium bowl; set aside. Separate biscuits and place on parchment-lined baking sheet. Use a 1-inch round biscuit cutter to cut holes out of the center of each biscuit.

2 Spray air fryer basket with no stick cooking spray. Place 3 to 4 donuts in single layer in air fryer basket without touching.

3 Air Fry on 350°F for 5 to 6 minutes or until golden brown and puffed, flipping halfway through. Return donuts to baking sheet. Repeat with remaining donuts and holes, if desired. (Note: Air Fry donut holes for 3 minutes only, tossing halfway through.) Keep donuts warm.

4 Mix melted butter and granulated sugar in small bowl. Brush warm donuts with butter mixture, then immediately place in bowl with Gingerbread Sugar, tossing to coat on both sides. Serve warm or at room temperature.

Salted Caramel Apple Hand Pies


Ingredients

1 package (14.1 ounces) refrigerated pie crusts (2 crusts)

3 medium Granny Smith apples, peeled, cored and cut into 1/2-inch pieces

1/4 cup McCormick® Naturally Flavored Salted Caramel Finishing Sugar, plus more for sprinkling

2 tablespoons unsalted butter

1 teaspoon cornstarch

1 teaspoon water

1 egg, beaten


INSTRUCTIONS

1 Line 2 large baking sheets with parchment paper. On a lightly floured surface, roll each pie crust into a 12-inch circle. Use a 4-inch round cookie cutter to cut out 8 circles from each crust, re-rolling scraps as needed. Place circles 3-inches apart on prepared baking sheets and refrigerate while preparing filling.

2 Mix apples, butter and Salted Caramel Sugar in large skillet. Cook on medium-high heat until mixture bubbles, about 5 minutes. Mix cornstarch and water in small bowl; add to apple mixture. Stir just until thickened. Remove from heat. Cool 10 minutes.

3 Preheat oven to 375°F. Place heaping tablespoons of filling in center of each dough circle. Fold dough over to enclose filling, pressing edges to seal and create a half-moon shape. Crimp edges with a fork to seal completely. Use a small sharp knife to cut two small slits in each pie. Brush with egg and sprinkle with additional Salted Caramel Sugar. Place pans in freezer 10 minutes.

4 Bake 25 to 30 minutes or until crusts are crispy and lightly browned and filling is bubbly. Remove from oven and cool on pans 5 minutes. Transfer to a wire rack to cool. Serve warm or at room temperature.

Salted Caramel Pumpkin Muffins


Topping

1/2 all-purpose flour

5 tablespoons McCormick® Naturally Flavored Salted Caramel Finishing Sugar

3 tablespoons unsalted butter, melted

Muffins

2 1/2 cups all-purpose flour

1 2/3 cups granulated sugar

1/3 cup McCormick® Naturally Flavored Salted Caramel Finishing Sugar

2 teaspoons baking powder

1 cup canned pumpkin

1 stick (8 tablespoons) unsalted butter, melted

2 eggs

1/4 cup milk

2 teaspoons McCormick® All Natural Pure Vanilla Extract


INSTRUCTIONS

1 Preheat oven to 375°F. Spray 12-cup muffin pan with no stick cooking spray; set aside. For the Topping, mix all ingredients in small bowl until well blended; set aside.

2 For the Muffins, whisk flour, granulated sugar, Salted Caramel Sugar and baking powder in large bowl until well blended. In a separate medium bowl, whisk pumpkin, butter, eggs, milk and vanilla until well blended. Stir pumpkin mixture into flour mixture just until combined.

3 Scoop heaping 1/3 cup of batter into each muffin cup. Sprinkle each with about 1 tablespoon of the topping mixture, pressing lightly to adhere.

4 Bake muffins 20 to 25 minutes or until lightly browned and toothpick inserted in center comes out mostly clean. Cool in pans 10 minutes before serving.

Salted Carmel Cider Cocktail


Ingredients

4 tablespoons McCormick® Naturally Flavored Salted Caramel Finishing Sugar, divided

1/2 cup apple cider, chilled, plus more for rim

2 ounces spiced rum

1/4 cup ginger beer, chilled substitution Substitutions available


INSTRUCTIONS

1 Place 2 tablespoons of the Salted Caramel Sugar on small plate. Moisten rims of 2 (10-ounce/300-ml)) beverage glasses with cider. Dip in Salted Caramel Sugar to heavily coat rim. Set aside.

2 Fill cocktail shaker with ice. Add cider, rum and remaining 2 tablespoons Salted Caramel Sugar. Shake until well mixed and chilled.

3 Strain mixture into prepared glasses. Top evenly with ginger beer. Serve immediately.

Candy Cane Martini


Ingredients

2 tablespoons McCormick® Candy Cane Finishing Sugar, divided

4 ounces (1/2 cup) white chocolate liqueur

2 ounces (1/4 cup) half-and-half, heavy cream

2 ounces (1/4 cup) vanilla vodka


1 Place 1 tablespoon of the Candy Cane Sugar on small plate. Moisten rims of 2 martini glasses. Dip rim of glasses into Candy Cane Sugar to coat.

2 Fill cocktail shaker halfway with ice. Add white chocolate liqueur, half-and-half, vanilla vodka and remaining 1 tablespoon Candy Cane Sugar; shake until well mixed and chilled. Strain into prepared glasses. Serve immediately.

Candy Cane Swirl Cookies


Ingredients

2 3/4 cups flour

1/4 teaspoon salt

1 1/4 cups sugar

1 cup (2 sticks) butter, softened

1 egg

1 teaspoon McCormick® All Natural Pure Vanilla Extract

1/4 teaspoon McCormick® Pure Peppermint Extract

3/4 teaspoon McCormick® Red Food Color

1/3 cup McCormick® Candy Cane Finishing Sugar


INSTRUCTIONS

1 Mix flour and salt in medium bowl. Set aside. Beat sugar and butter in large bowl with electric mixer on medium speed until light and fluffy. Add egg; mix well. Gradually stir in flour mixture on low speed until well mixed. Divide dough in half. Add vanilla to one half; mix well. Add peppermint extract and food color to second half; mix until dough is evenly tinted.

2 Roll out vanilla dough between wax paper to 15x9-inch rectangle. Repeat with peppermint dough. Peel off the top wax paper from each dough rectangle. With the bottom wax paper still in place, carefully invert vanilla dough onto peppermint dough. Gently press layers together. Peel off the top wax paper. Using the bottom wax paper as a guide, roll dough tightly from the long side into a log. Wrap in plastic wrap. Refrigerate 2 hours or overnight until firm.

3 Preheat oven to 375°F. Cut dough log into 3 equal pieces. Place Candy Cane Sugar on shallow plate. Roll dough logs in sugar, pressing gently to coat dough. Slice each log into 1/4- to 1/2-inch-thick slices. Place 2 inches apart on greased baking sheets.

4 Bake 10 to 12 minutes or until cookies are set. Cool on baking sheets 1 minute. Remove to wire racks; cool completely.

Candy Cane Bark


1 package (12 ounces) white chocolate chips

2 tablespoons plus 2 teaspoons McCormick® Candy Cane Finishing Sugar, divided


INSTRUCTIONS

1 Microwave white chocolate chips in large microwave-safe bowl on HIGH for 1 1/2 to 2 minutes or until almost melted, stirring after 1 minute. Stir until chocolate is completely melted and mixture is smooth. Stir in 2 tablespoons of the Candy Cane Sugar.

2 Pour melted chocolate onto large foil-lined baking sheet, spreading to 1/4-inch thickness. Sprinkle evenly with remaining 2 teaspoons Candy Cane Sugar.

3 Refrigerate about 10 minutes or until firm. Break into irregular pieces to serve. Store in covered container at cool room temperature or in refrigerator up to 5 days.

Sunday, September 22, 2024

Lobster Ravioli & Shrimp in a Tomato Cream Sauce

 4 Scallions

2 Lemon

20 ounces Shrimp

½ cup Panko Breadcrumbs

18 ounces Lobster Ravioli

2 teaspoons Italian Seasoning

3 ounces Tomato Paste

4 tablespoons Cream Cheese

4 tablespoons Sour Cream

½ cup Parmesan Cheese

4 tablespoons Butter

1 tablespoon Olive Oil

Salt

Pepper

• Bring a large pot of salted water to a boil. Wash and dry all produce. • Zest and quarter lemon (for 4 servings, zest 1 lemon and quarter both). Trim and thinly slice scallions, separating whites from greens. • Rinse shrimp* under cold water; pat dry with paper towels.

• Heat a large drizzle of olive oil in a large, preferably nonstick, pan over medium-high heat. Add panko and cook, stirring, until golden brown, 3-5 minutes. • Turn off heat; transfer to a small bowl and stir in as much lemon zest as you like. Season with salt and pepper. Wipe out pan.

• Once water is boiling, add ravioli to pot and immediately reduce heat to low. Cook, stirring occasionally, until tender and floating to the top, 3-4 minutes. • Reserve ½ cup pasta cooking water (1 cup for 4 servings), then gently drain.

• While ravioli cook, season shrimp all over with half the Italian Seasoning (you’ll use the rest later), salt, and pepper. • Heat a drizzle of olive oil in pan used for panko over medium-high heat. Add shrimp and cook, stirring, until opaque and cooked through, 3-4 minutes. Reduce heat to low.

Make Sauce

• Add 1 TBSP butter (2 TBSP for 4 servings) and scallion whites to pan with shrimp. Cook until scallion whites are softened, 1 minute. Stir in tomato paste until fully incorporated, then add reserved pasta cooking water; stir to combine. • Whisk in cream cheese, sour cream, 2 TBSP butter, and a squeeze of lemon juice to taste until combined and creamy, 1-2 minutes more. Season with remaining Italian Seasoning, salt, and pepper.

• Add ravioli to pan with sauce; stir to coat. • Divide between bowls. Sprinkle with lemony panko, Parmesan, scallion greens, and any remaining lemon zest. Serve with any remaining lemon wedges on the side.

Sunday, May 26, 2024

Gone in 60 Seconds Dip

1 c. cheddar cheese, shredded

1 c. chopped pecans

green onions, sliced thin

1/4 c mayo

1/2 c. of cream cheese

red pepper jelly

crackers


Mix cheese, nuts, mayo, pecans and onions. Form into a ball or place in a dish. Freeze or plate chill for a few hours before serving. Top with jelly. Serve with crackers.

Peanut Brittle

 3 Cups white sugar

1 cup Karo syrup

1/2 cup water

3 cups raw peanuts

3 teaspoons soda

1 teaspoon salt

3 teaspoons butter

1 teaspoon vanilla


Mix sugar, syrup and water together and cook up to 250 degrees. Mixture will thread. Add peanuts and stir continuously, cooking until syrup mixture turns light brown in color, up to 310 degrees. Remove from heat and add soda, salt, butter and vanilla. Mix thoroughly. Pour onto butter cookie sheets spreading as thinly as possible.

Monday, January 22, 2024

Grilled Marinated Chicken

These 5 grilled marinated chicken breast recipes will become your life saver during those busy week nights.

 Ingredients

1 lb skinless boneless chicken breasts (this is for one marinade of your choice)

Mexican Chipotle

3 tbsp canola oil

Juice of 1 lime

2 tbsp chipotle in adobo sauce

2 cloves garlic chopped

1 tsp cumin

1 tsp chili powder

1 tsp salt

Balsamic Rosemary

1/4 cup extra virgin olive oil

1/4 cup balsamic vinegar

2 clove garlic minced

2 sprigs rosemary leaves removed and minced

Zest of 1 orange

Juice of 1/2 orange

2 tsp maple syrup

1 tsp salt

1/4 tsp pepper

Mediterranean Lemon Oregano

1/4 cup extra virgin olive oil

1 tbsp lemon zest

1/4 cup fresh lemon juice

5 cloves garlic minced

2 tbsp dried oregano

1 tsp honey

1 tsp salt

1/4 tsp pepper

Tandoori Curry

1 cup plain Greek yogurt

Juice of 1 lemon

2 tbsp curry powder

1 tbsp grated ginger

1 clove garlic minced

3 tbsp canola oil

1 tsp salt

1/4 tsp pepper

Thai Mango Lime

1 cup mango diced

Juice of 1 lime

1 tsp fish sauce

1 tbsp coconut sugar

1/4 cup cilantro leaves chopped

3 tbsp canola oil

3/4 tsp Thai red chilis minced

1 tsp salt

Instructions

Mexican Chipotle:

In a food processor, puree all of the ingredients and set aside.

Balsamic Rosemary:

In a bowl, mix everything together and set aside.

Mediterranean Lemon Oregano:

In a bowl, mix everything together and set aside.

Tandoori Curry:

In a bowl, mix everything together and set aside.

Thai Mango Lime:

In a food processor, puree all of the ingredients and set aside.

Grilled Marinated Chicken:

Transfer the marinade of your choice and the chicken into a large plastic bag. Allow to marinate for 4 hours or overnight.

Preheat your grill to medium high heat. Remove some of the residual marinade (especially any large pieces of garlic, rosemary and a thick coat of yogurt) and transfer to the grill. Grill for about 10 to 15 minutes per side, until they reach an internal temperature of 165F. Allow to rest before slicing and enjoy!

Source: AbbeysKitchen

Chicken Shawarma and Sweet Potato Fry Bowls

2 pounds boneless skinless chicken breasts, cut into bite size chunks

1 tablespoon honey

2 teaspoons paprika

2 teaspoons cumin

2 teaspoons kosher salt and pepper

juice of 2 lemons

4 cloves garlic, minced or grated

pinch of crushed red pepper flakes

5 tablespoons olive oil

2 sweet potatoes, cut into matchsticks

1 bunch asparagus, ends trimmed

4 cups cooked couscous or quinoa

1/2 cup pitted kalamata olives and oil packed sun-dried tomatoes, oil drained

crumbled goat cheese, shredded lettuce, avocado, sliced cucumbers, pickled red onions, pine nuts, lemons, mint, and or cilantro, for serving

GARLIC TAHINI YOGURT

1 cup plain greek yogurt

2 tablespoons tahini

1-2 cloves garlic, minced or grated

juice of 1/2 a lemon

1 tablespoon chopped fresh mint

Instructions

1. In a large gallon size zip-top bag, combine the chicken, honey, paprika, cumin, salt, pepper, lemon juice, garlic, crushed red pepper flakes, and 2 tablespoons olive oil, toss to combine. Seal and chill for 30 minutes or up to 12 hours.

2. Preheat the oven to 425 degrees F.

3. Place the sweet potatoes on a large baking sheet and toss with 2 tablespoons olive oil, salt and pepper. Transfer to the oven and cook for 15-20 minutes, then flip and bake for 15-20 minutes more.

4. Place the asparagus on a baking sheet and toss with the remaining 1 tablespoon olive oil, kosher salt and pepper. Transfer to the oven and roast for 10-15 minutes. 

5. Place the marinated chicken on a large baking sheet and spread in an even layer. Transfer to the oven and roast for 15-20 minutes or until the chicken is cooked through. 

6. Divide the couscous among 4-6 storage containers and arrange the chicken, sweet potatoes, asparagus, olives, and sun-dried tomatoes on top. Alternately, you can store the couscous, chicken, and veggies in separate containers and assemble when ready. Food will keep in the fridge for up to 1 week. 

7. Before serving, warm each bowl if desired and top with garlic yogurt (see below) and your desired toppings.

GARLIC TAHINI YOGURT

1. Combine all ingredients in a small bowl. Taste and adjust seasonings to your liking. Keep stored in the fridge for up to 1 week. 


Source: HalfBakedHarvest

Sheet Pan Garlic-Parmesan Chicken Tenders and Veggies


Servings: 4 servings

Prep 10minutes

Cook: 25 minutes

Ready in: 35 minutes


Ingredients

1 1/4 lbs boneless skinless chicken breasts , sliced into 1 1/4-inch thick strips

1/2 cup plain bread crumbs

1/4 cup + 2 Tbsp slightly packed , finely grated parmesan cheese

3/4 tsp dried basil

1/4 tsp each dried oregano , thyme and crushed rosemary

Salt and freshly ground black pepper

5 Tbsp olive oil , divided

2 cloves garlic , minced

1 lb fresh green beans , tops trimmed

1 cup grape tomatoes , sliced into halves

Instructions

Preheat oven to 400 degrees. Line a large rimmed baking sheet with parchment paper.

In a shallow dish whisk together bread crumbs, parmesan, basil, oregano, thyme, and rosemary and season with salt and pepper to taste. Add 4 Tbsp olive oil to a separate shallow dish and stir in garlic.

Working with one chicken tender at a time, dredge both sides in olive oil then immediately transfer to bread crumb mixture and coat both sides, while pressing to adhere.

Transfer to one side of the baking sheet. Repeat process with remaining chicken tenders and placing them in a row along one side of baking sheet. Spread remaining bread crumbs over tops of chicken and gently press.

On opposite side of baking dish, toss green beans with 1 Tbsp olive oil. Spread beans to edges of baking dish, sprinkle with salt and pepper to taste.

Roast in preheated oven 23 - 25 minutes, tossing green beans once halfway through cooking, until chicken is golden brown and green beans are crisp-tender (if you want the tomatoes roasted too add them during the last 10 minutes of cooking).

Remove from oven, sprinkle tomatoes over green beans. Serve warm, garnish chicken with fresh parsley if desired.

Recipe source: Cooking Classy

Honey Sriracha Glazed Meatballs

 INGREDIENTS


For the meatballs:

2 lbs lean ground turkey (or lean ground beef)

1 cup whole wheat panko breadcrumbs

2 eggs

1/4 cup green onions, chopped

1/2 teaspoon garlic powder

1/2 teaspoon salt

1/2 teaspoon black pepper

For the sauce:

1/4 cup Sriracha

3 tablespoons reduced-sodium soy sauce

3 tablespoons rice vinegar

3 tablespoons honey

1 Tbsp grated fresh ginger

3 cloves garlic, minced

1/2 teaspoon sesame oil


INSTRUCTIONS

Preheat oven to 375 degrees F.

In a large bowl, mix together turkey, breadcrumbs, eggs, green onions, garlic powder and salt/pepper until well combined. Shape mixture into 1 1/2-inch balls (you’ll make roughly 40 balls) and place spaced apart on prepared baking sheets lightly sprayed with cooking spray.

Bake meatballs for 20 to 25 minutes, or until browned and cooked through.

While the meatballs are baking, combine all the ingredients for the sauce in a small saucepan and bring to a boil over medium heat, whisking continuously. Reduce heat and simmer for 8 to 10 minutes (the sauce will start to thicken) then toss with the meatballs.

Serve immediately over brown rice and top with green onions and a few sesame seeds. Enjoy!

Source: Eatyourselfskinny

Sheet Pan Shrimp Fajitas

 Servings: 4

Calories: 232 kcal


Ingredients

1 1/2 pounds shrimp peeled and deveined

1 yellow bell pepper sliced thin

1 red bell pepper sliced thin

1 orange bell pepper sliced thin

1 small red onion sliced thin

1 1/2 tablespoons extra virgin olive oil

1 teaspoon kosher salt

several turns of freshly ground pepper

2 teaspoon chili powder

1/2 teaspoon garlic powder

1/2 teaspoon onion powder

1/2 teaspoon ground cumin

1/2 teaspoon smoked paprika

lime

fresh cilantro for garnish

tortillas warmed

Instructions

Preheat oven to 450 degrees.

In a large bowl, combine onion, bell pepper, shrimp, olive oil, salt and pepper and spices.

Toss to combine.

Spray baking sheet with non stick cooking spray.

Spread shrimp, bell peppers and onions on baking sheet.

Cook at 450 degrees for about 8 minutes. Then turn oven to broil and cook for additional 2 minutes or until shrimp is cooked through.

Squeeze juice from fresh lime over fajita mixture and top with fresh cilantro.

Serve in warm tortillas.

Recipe Notes

If preferred, remove shrimp tails prior to cooking for easier serving.


Source: https://www.number-2-pencil.com/one-sheet-pan-shrimp-fajitas/?utm_content=bufferad93c&utm_medium=social&utm_source=pinterest.com&utm_campaign=buffer

Pad Thai


Prep Time: 12 mins

Cook Time: 13 mins

Total Time: 25 mins

Servings: 4 servings

SAUCE:

3-1/2 Tablespoons tamarind concentrate more watery - NOT tamarind paste which is thicker (HIGHLY recommended but if you can't find it, sub with 1 1/2 tablespoons peanut butter + 1/4 cup fresh lime juice)

2 teaspoons Thai red chili sauce Sambal Oelek or Sriracha to taste

4 Tablespoons red boat fish sauce 

3 Tablespoons oyster sauce

4 Tablespoons coconut sugar or brown sugar (if not paleo) - leave out for Whole30

1.5 teaspoons concentrated tomato paste , optional for additional color and to mimic the North American version as the authentic Thai version does not use this

FOR THE STIR FRY:

8 ounces dried uncooked rice noodles , sub with Miracle Noodle, Shirataki or Konjac noodles for grain-free or spiralized vegetables for Whole30

2 Tablespoons cooking oil , avocado oil for a healthier version

6 oz chicken breast , sliced thinly (can also sub with shrimp or leave out for vegetarian)

2 garlic cloves , minced

1 teaspoon freshly grated ginger

1 shallot , diced

1/3 cup grated carrots

1 red or green bell pepper , thinly sliced (I used a combo of both for extra color)

1 large egg , lightly beaten (leave out for vegan)

1 lime wedge

salt, black pepper and more fish sauce to taste

GARNISH and TOPPINGS:

Chopped fresh cilantro , bean sprouts, chopped roasted peanuts, green onions and additional lime wedges

FOR MEAL PREP:

Takeout style Lunch containers

Glass Lunch Boxes


PREPARE THE NOODLES:

Prepare the rice noodles according to package instructions. (I usually just soak mine for 6-7 minutes in boiling water). They should be soft but not mushy - see my photo above for how it should look at this point. Drain and immediately rinse under cool water and set aside in a colander.

MAKE THE SAUCE:

While the noodles are cooking, whisk together the sauce ingredients in a medium bowl. If you prefer a sweeter pad thai - add additional sugar. For a spicier version, add additional chili paste.

STIR FRY:

Heat the oil in a large wok or non-stick skillet over high heat. Add the chicken and cook until browned and mostly cooked through (about 3-4 minutes). Stir in the ginger, garlic, and shallots and cook for 30 seconds, until fragrant. Add the carrots and bell pepper and cook for 1-2 minutes, until tender crisp. Push all the ingredients over to one side of the pan. Pour the beaten egg and scramble directly in the skillet.

Cubed chicken breast in a pan

Add noodles and pour the sauce over top. Toss with tongs to evenly coat noodles. Remove from heat (do not overcook the noodles or they will get soggy).

Squeeze in juice from the lime wedge and adjust seasoning by adding some salt, black pepper, fish sauce, (tomato paste - if using) and chili paste.

Serve hot on a large platter with garnishes by sprinkling on cilantro, bean sprouts, peanuts and green onions and additional lime wedges on the side.

FOR MEAL PREP:

For meal prep, divide the noodles evenly into lunch boxes and store in refrigerator until ready to reheat.

If you like more sauce, double the amount of sauce and add desired amount and save the rest in an airtight container for next time or use it up in a stir-fry or salad.

Source: https://lifemadesweeter.com/chicken-pad-thai/#wprm-recipe-container-30332

Chili Dijon Pork Tenderloin

Prep Time: 15 mins

Cook Time: 25 mins

Total Time: 1 hour

Servings: 6


minut 25
minutes

Ingredients

  • 1 pkg. Smithfield® Prime Fresh Pork Tenderloin, trimmed (comes with 2 pieces)
  • 1 pound green beans, trimmed
  • 1 1/2 pounds fingerling potatoes, unpeeled, halved lengthwise
  • olive oil
  • salt and pepper

Pork Brine

  • 3 tablespoons salt
  • 3 cups warm water
  • 2 tablespoons cider vinegar
  • 2 tablespoons brown sugar
  • 1 cup ice cubes

Spice Rub

  • 1 TBS EACH chili pwdr, garlic pwdr, brown sugar,
  • 1 tsp EACH salt, cumin, ancho chili pwdr, onion pwdr
  • 1/2 tsp EACH smoked paprika, dried parsley, dried thyme
  • 1/4 teaspoon pepper

Chili Dijon Sauce

  • 1/2 cup Asian sweet red chili sauce (like Mae Ploy)
  • 1/4 cup Dijon mustard
  • 2 tablespoons brown sugar
  • 1 teaspoon reserved Chili Rub (in directions)

Instructions

  • BRINE: In a gallon-size freezer bag, mix salt with warm water. Add the remaining Brine ingredients, followed by pork. Brine for exactly 20 minutes then remove pork from brine, rinse and pat dry. The pork becomes mealy if left in the brine any longer.
  • CHILI RUB AND GLAZE: Meanwhile, whisk together all of the Chili Rub ingredients in a medium bowl. Remove 1 teaspoon Rub to a separate medium bowl and whisk in the Chili Dijon Glaze ingredients. Set aside.
  • VEGETABLES: Add green beans to one half of a large rimmed baking sheet and the potatoes to the other. Toss green beans with 1 tablespoon olive oil, 1/4 teaspoon Chili Rub, 1/4 teaspoon salt, and 1/8 teaspoon pepper. Toss potatoes with 2 tablespoons olive oil, 1/4 teaspoon Chili Rub, 1/4 teaspoon salt, and 1/8 teaspoon pepper.
  • Arrange green beans down the center of the baking sheet as pictured, some will overlap. Arrange potatoes, cut side down, on both sides of green beans.
  • PORK: Preheat oven to 425 degrees F. Whisk together remaining Chili Rub spices with 3 tablespoons olive oil. Rub patted dry pork all over with Rub.
  • Heat 2 tablespoons olive oil in a large nonstick skillet over medium high heat. When oil is very hot and smoking, add pork tenderloins. Sear each side until browned, approximately 1 minute per side. Place tenderloins lengthwise on top of green beans without touching each other. Separate out 1/4 cup Chili Dijon Glaze and brush it evenly over pork.
  • ROAST: Bake until pork registers 145 and 150 degrees F (63 and 65 degrees C) at the thickest part of the tenderloin, 25-30 minutes. This means the pork will be juicy and slightly pink in the middle. When pork is done, let stand 10 minutes before slicing. Your vegetables should be done at the same time as the pork, but if not, then remove pork to cutting board, tent with foil, and continue roasting vegetables an additional 5-10 minutes or until tender.
  • SERVE (optional): Transfer vegetables to platter and pour over any accumulated juices. Season with additional salt and pepper if desired. Cut pork into thin slices and place over vegetables. Serve with remaining Chili Dijon Sauce if desired.

Source: https://carlsbadcravings.com/wprm_print/36297